In the realm of network security, Nmap reigns supreme as the best tool for scanning networks. Its extensive array of commands and options makes it indispensable for professionals and enthusiasts alike. In this post, we delve deep into the world of Nmap, uncovering its most essential functionalities and exploring practical examples that showcase its versatility.
From basic scans to advanced techniques, we’ll walk you through the core functionalities of Nmap, providing detailed explanations and real-world scenarios to enhance your understanding. Whether you’re a seasoned cybersecurity expert or just starting your journey, this guide will equip you with the knowledge and skills needed to harness the full potential of Nmap.
We will demystify network scanning, unraveling the complexities of Nmap one argument at a time.
The legal issues
While Nmap itself is a legitimate tool designed for network exploration and security auditing, its misuse can potentially violate laws and regulations. Unauthorized scanning of networks or systems without proper authorization can lead to legal consequences, including civil and criminal liabilities.
Therefore, it’s crucial to ensure that you have explicit permission from the network owner or administrator before conducting any scanning activities with Nmap. This permission should be obtained in writing to avoid any misunderstandings or legal issues. For more information about this topic, I really recommend this reading: https://nmap.org/book/legal-issues.html
Additionally, users should be aware of the laws and regulations regarding network scanning and cybersecurity in their jurisdiction. Laws such as the Computer Fraud and Abuse Act (CFAA) in the United States and similar legislation in other countries govern unauthorized access to computer systems and networks.
The information provided on this site is intended for educational purposes only. While we strive to offer accurate and up-to-date content regarding hacking and security, we cannot be held responsible for any misuse or illegal activity conducted with the knowledge gained from this site. Users are solely responsible for their actions and should use this information ethically and within the boundaries of the law.
Installation
The installation process may be different depending on your operating system, in this guide I will be using a Kali Linux machine, so, Nmap is already installed, but in many others Linux distributions the Nmap repositories I already added by default, so it can bem just a manner of sudo apt-get install nmap. Alternatively, you can check for specific installation procedures on the Nmap page: https://nmap.org/download.html
Doing a first scan
To perform a scan with Nmap we just need to open your terminal and type nmap <target>, this will perform a simple scan on the target for the top 1000 ports, we can see this type os scan down bellow:
┌──(kali㉿atropos)-[~]
└─$ nmap 192.168.0.59
Starting Nmap 7.94SVN ( https://nmap.org ) at 2024-04-14 11:08 EDT
Nmap scan report for 192.168.0.59
Host is up (0.00026s latency).
Not shown: 983 closed tcp ports (conn-refused)
PORT     STATE SERVICE
21/tcp   open  ftp
22/tcp   open  ssh
25/tcp   open  smtp
80/tcp   open  http
139/tcp  open  netbios-ssn
443/tcp  open  https
445/tcp  open  microsoft-ds
512/tcp  open  exec
513/tcp  open  login
514/tcp  open  shell
666/tcp  open  doom
3306/tcp open  mysql
5901/tcp open  vnc-1
6001/tcp open  X11:1
8080/tcp open  http-proxy
8443/tcp open  https-alt
9080/tcp open  glrpc

Nmap done: 1 IP address (1 host up) scanned in 0.11 seconds
On the example scans on this post I will be scanning a bWapp virtual machine, that is old machine made for testing some OWASP top 10 vulnerabilities (but nowadays, we can find better machines since the top 10 in the bWapp machine is from 2014, but this machine will serve as a good target to your scans).
Target specifications
On the previous example we used a single IP address as a target for the scan, but Nmap also allow for some other types of target specifications, we can use domains names nmap google.com and ranges of IP’s nmap 192.168.0.50-60, where all IPs on that range will be scanned.
We can also provide a list of IPs to be scanned as a file to Nmap, using the -iL argument:
┌──(kali㉿atropos)-[~/Documents/nmap]
└─$ ls
ip.txt

┌──(kali㉿atropos)-[~/Documents/nmap]
└─$ cat ip.txt
192.168.0.58
192.168.0.59

┌──(kali㉿atropos)-[~/Documents/nmap]
└─$ nmap -iL ip.txt
Starting Nmap 7.94SVN ( https://nmap.org ) at 2024-04-14 11:38 EDT
Nmap scan report for 192.168.0.58
Host is up (0.00030s latency).
All 1000 scanned ports on 192.168.0.58 are in ignored states.
Not shown: 1000 closed tcp ports (conn-refused)

Nmap scan report for 192.168.0.59
Host is up (0.00038s latency).
Not shown: 983 closed tcp ports (conn-refused)
PORT     STATE SERVICE
21/tcp   open  ftp
22/tcp   open  ssh
25/tcp   open  smtp
80/tcp   open  http
139/tcp  open  netbios-ssn
443/tcp  open  https
445/tcp  open  microsoft-ds
512/tcp  open  exec
513/tcp  open  login
514/tcp  open  shell
666/tcp  open  doom
3306/tcp open  mysql
5901/tcp open  vnc-1
6001/tcp open  X11:1
8080/tcp open  http-proxy
8443/tcp open  https-alt
9080/tcp open  glrpc

Nmap done: 2 IP addresses (2 hosts up) scanned in 5.66 seconds
Here I created a file named ip.txt, inside, it contains a list of IPs, in that case it has just 2 IPs, but this list can be a big as you want (or as your computer can handle). We can see on the output of Nmap that the target 192.168.0.58 all the 1000 ports didn’t return any result, that’s because I don’t have a machine on that IP address, so Nmap couldn’t scan anything there. The target 192.168.0.59 just proceded as normal, since that is an actual IP address on the network.
Host Discovery
Host Discovery is an important part of network reconnaissance, before we proceed to a port scan is important to know exactly how many machines are connected to a network and which are their respective IPs. To scan a network without scanning the ports, we can use the -sn argument.
┌──(kali㉿atropos)-[~/Documents/nmap]
└─$ nmap 192.168.0.* -sn
Starting Nmap 7.94SVN ( https://nmap.org ) at 2024-04-14 12:22 EDT
Nmap scan report for 192.168.0.1
Host is up (0.0065s latency).
Nmap scan report for 192.168.0.15
Host is up (0.0086s latency).
Nmap scan report for 192.168.0.53
Host is up (0.023s latency).
Nmap scan report for 192.168.0.58
Host is up (0.0015s latency).
Nmap scan report for 192.168.0.59
Host is up (0.0015s latency).
Nmap done: 256 IP addresses (5 hosts up) scanned in 13.46 seconds
On the example we can see that the IP provided was 192.168.0.* with this we instruct Nmap to perform a scan on the entire range of IPs, from 192.168.0.1 to 192.168.0.255. The example shows only the hosts that responded to the discovery probes.
Port Scanning
As we saw previously, the command nmap 192.168.0.59 already scanned all the 1000 top ports, but we can further customize the port scanning process as we may need. To perform a scan on a specific port, we can use the -p <port> argument, with this we can specify a single port or a port range to be scanned. Another important argument is the -p- that will scan ports from 1 through 65535.
┌──(kali㉿atropos)-[~/Documents/nmap]
└─$ nmap 192.168.0.59 -p 80
Starting Nmap 7.94SVN ( https://nmap.org ) at 2024-04-14 13:10 EDT
Nmap scan report for 192.168.0.59
Host is up (0.00060s latency).

PORT   STATE SERVICE
80/tcp open  http

Nmap done: 1 IP address (1 host up) scanned in 5.57 seconds
This shows us something similar to the first scan we made, but now, we have only the results for the port 80. Note that Nmap also provide as STATE and a SERVICE to the port. The STATE can be:
1) open: A open port means that there is an application accepting connections on that same port.
2) closed: A closed means that the port receives and responds to Nmap probe packets, but there is no application listening on it.
3) filtered: A filtered port means that the discovery probes could not determine if the port is open, that can happen when there is some kind of firewall between the Nmap and the target.
4) unfiltered: A unfiltered state means that a port is accessible, but Nmap is unable to determine whether it is open or closed.
5) open|filtered: This is state means that Nmap is unable to determine if the port is open or filtered.
6) closed|filtered: This is state means that Nmap is unable to determine if the port is closed or filtered.
More information can be found about the port states on the Nmap man page: https://linux.die.net/man/1/nmap
Port Scanning Techniques
On the man page we can see a lot of techniques that can be used on port scanning, here we will turn your attention to the most important ones, by that I mean the ones that are most used.
TCP SYN scan
According to the man page, the TCP SYN scan is the most popular technique for scanning ports, that’s because the SYN scan is fast and stealthy since it never completes TCP connections. Let’s see how that works, we can use the SYN scan technique with the argument -sS, but first let’s see the packages of a normal scan with Wireshark.
┌──(kali㉿atropos)-[~]
└─$ nmap 192.168.0.59 -p 80
Starting Nmap 7.94SVN ( https://nmap.org ) at 2024-04-14 18:39 EDT
Nmap scan report for 192.168.0.59
Host is up (0.0018s latency).

PORT   STATE SERVICE
80/tcp open  http

Nmap done: 1 IP address (1 host up) scanned in 0.08 seconds
To visualize the packages we can use Wireshark, and to help filter the packages we can use those filters:
(ip.src==192.168.0.58 and ip.dst==192.168.0.59) or (ip.src==192.168.0.59 and ip.dst==192.168.0.58)Here we can see the Wireshark output when we capture the packeges of a regular scan on Nmap:
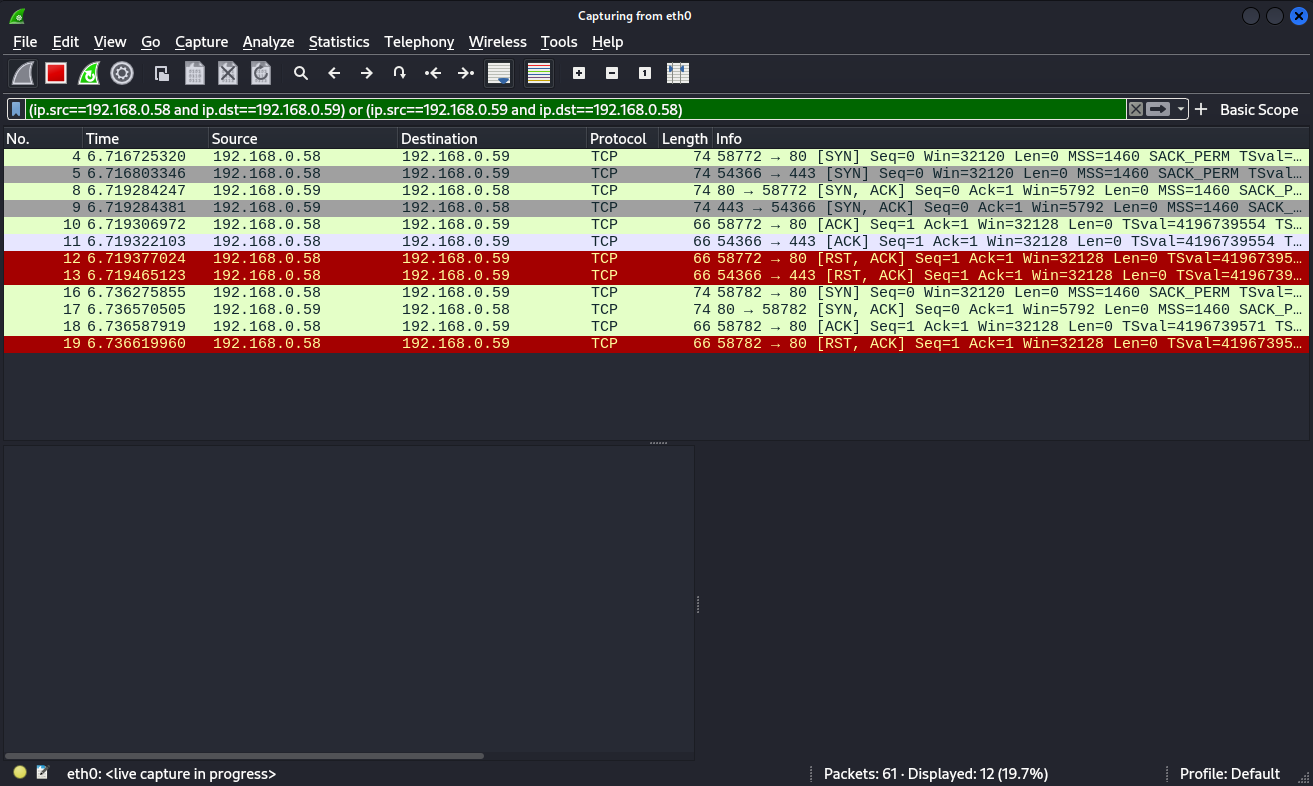
Let’s take the last 4 packages for example, there we can see that the connection starts with a SYN (Synchronize) flag, that indicates that a connection has been started, after that we can see another package with the flag ACK (Acknowledgment), and by the end we can see an RST (Reset) flag that is indicating the end of a connection, this shows the Three-way Handshake.
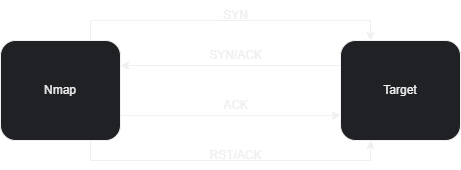
Now let’s see how the argument -sS really impacts on the information send. First, let’s start your Wireshark again and run the command:
┌──(kali㉿atropos)-[~]
└─$ sudo nmap 192.168.0.59 -p 80 -sS
[sudo] password for kali:
Starting Nmap 7.94SVN ( https://nmap.org ) at 2024-04-14 19:01 EDT
Nmap scan report for 192.168.0.59
Host is up (0.00034s latency).

PORT   STATE SERVICE
80/tcp open  http
MAC Address: 08:00:27:45:94:8E (Oracle VirtualBox virtual NIC)

Nmap done: 1 IP address (1 host up) scanned in 5.74 seconds
On the Wireshark, we can see this now (changing the filters just a bit as you can see):
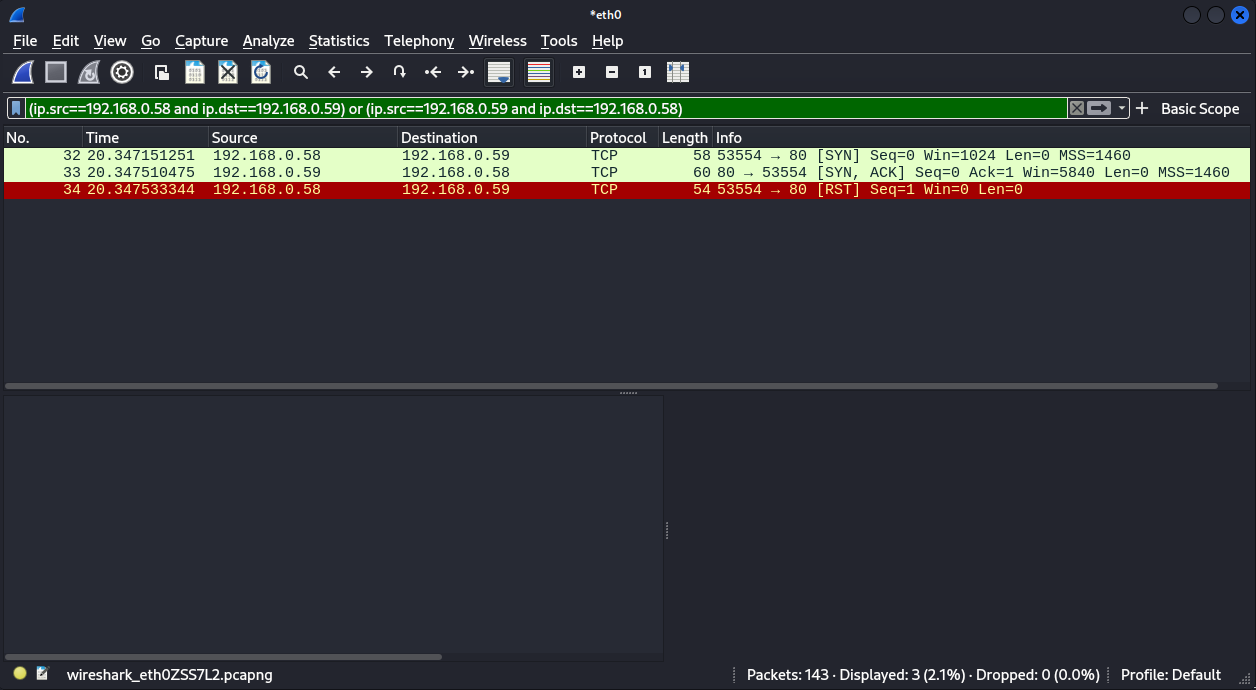
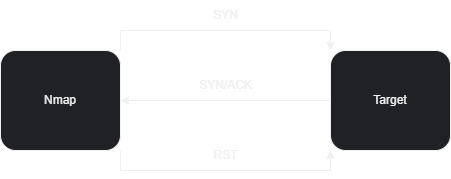
Note that, just as in the previous example we have a SYN flag starting the connection, but soon after that we have an RST flag, terminating the connection, that means the Three-way Handshake wasn’t complete, so, less information was given to the target.
TCP connect scan
This is the standard type of scan from Nmap, the first scan that we performed in this post, so, using the -sT or not makes any difference.
UDP scans
UDP scans can be performed with the argument -sU, it is as simple as the name suggests, it scans for ports and services running under the UDP protocol. Also, note that scanning with UDP protocol is somewhat strange since many applications that runs over UDP will not respond to the discovery probes or respond with an error.
┌──(kali㉿atropos)-[~]
└─$ sudo nmap 192.168.0.59 -p 80 -sU
Starting Nmap 7.94SVN ( https://nmap.org ) at 2024-04-15 11:18 EDT
Nmap scan report for 192.168.0.59
Host is up (0.00040s latency).

PORT   STATE  SERVICE
80/udp closed http
MAC Address: 08:00:27:45:94:8E (Oracle VirtualBox virtual NIC)

Nmap done: 1 IP address (1 host up) scanned in 5.94 seconds
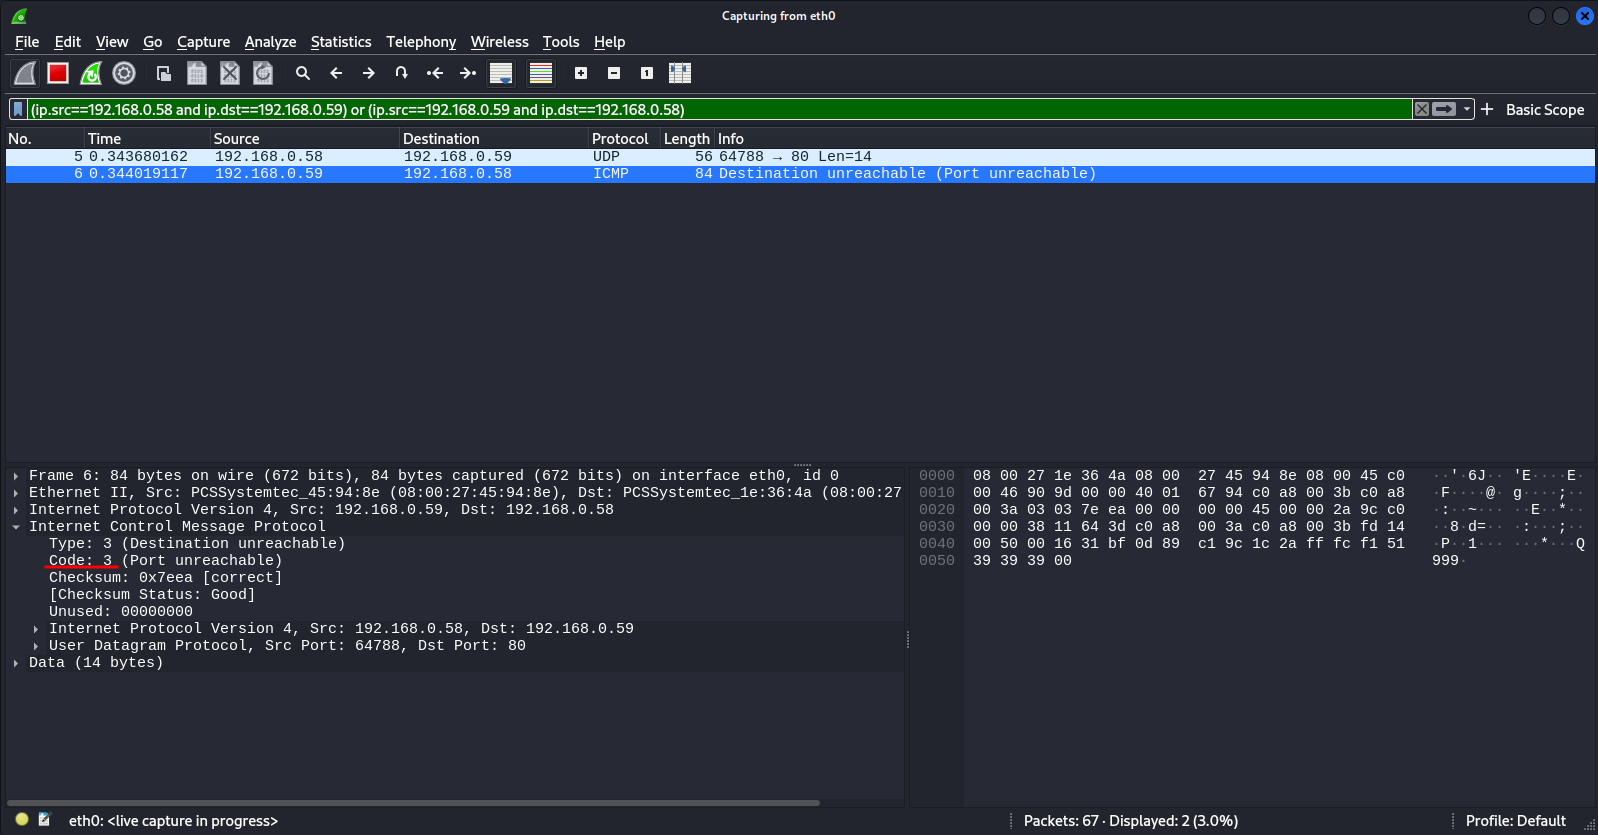
When we run a Nmap scan on the port 80, that we know are running under the TCP protocol, we get back a STATE closed, we can see ICMP port unreachable error (type 3, code 3) on Wireshark:
Service and Version Detection
The -sV argument allows us to get some more information about the service that is listening on a given scanned port. Knowing the service specifications can allow us to search for some exploits on that given service. We can see down below a version detection scanning:
┌──(kali㉿atropos)-[~]
└─$ sudo nmap 192.168.0.59 -p 80 -sV
Starting Nmap 7.94SVN ( https://nmap.org ) at 2024-04-15 11:52 EDT
Nmap scan report for 192.168.0.59
Host is up (0.0064s latency).

PORT   STATE SERVICE VERSION
80/tcp open  http    Apache httpd 2.2.8 ((Ubuntu) DAV/2 mod_fastcgi/2.4.6 PHP/5.2.4-2ubuntu5 with Suhosin-Patch mod_ssl/2.2.8 OpenSSL/0.9.8g)
MAC Address: 08:00:27:45:94:8E (Oracle VirtualBox virtual NIC)

Service detection performed. Please report any incorrect results at https://nmap.org/submit/ .
Nmap done: 1 IP address (1 host up) scanned in 6.79 seconds
Since we ran the Nmap as sudo the scan technique used by default is a TCP SYN scan, as we can see by the incomplete 3-way handshake on the Wireshark:
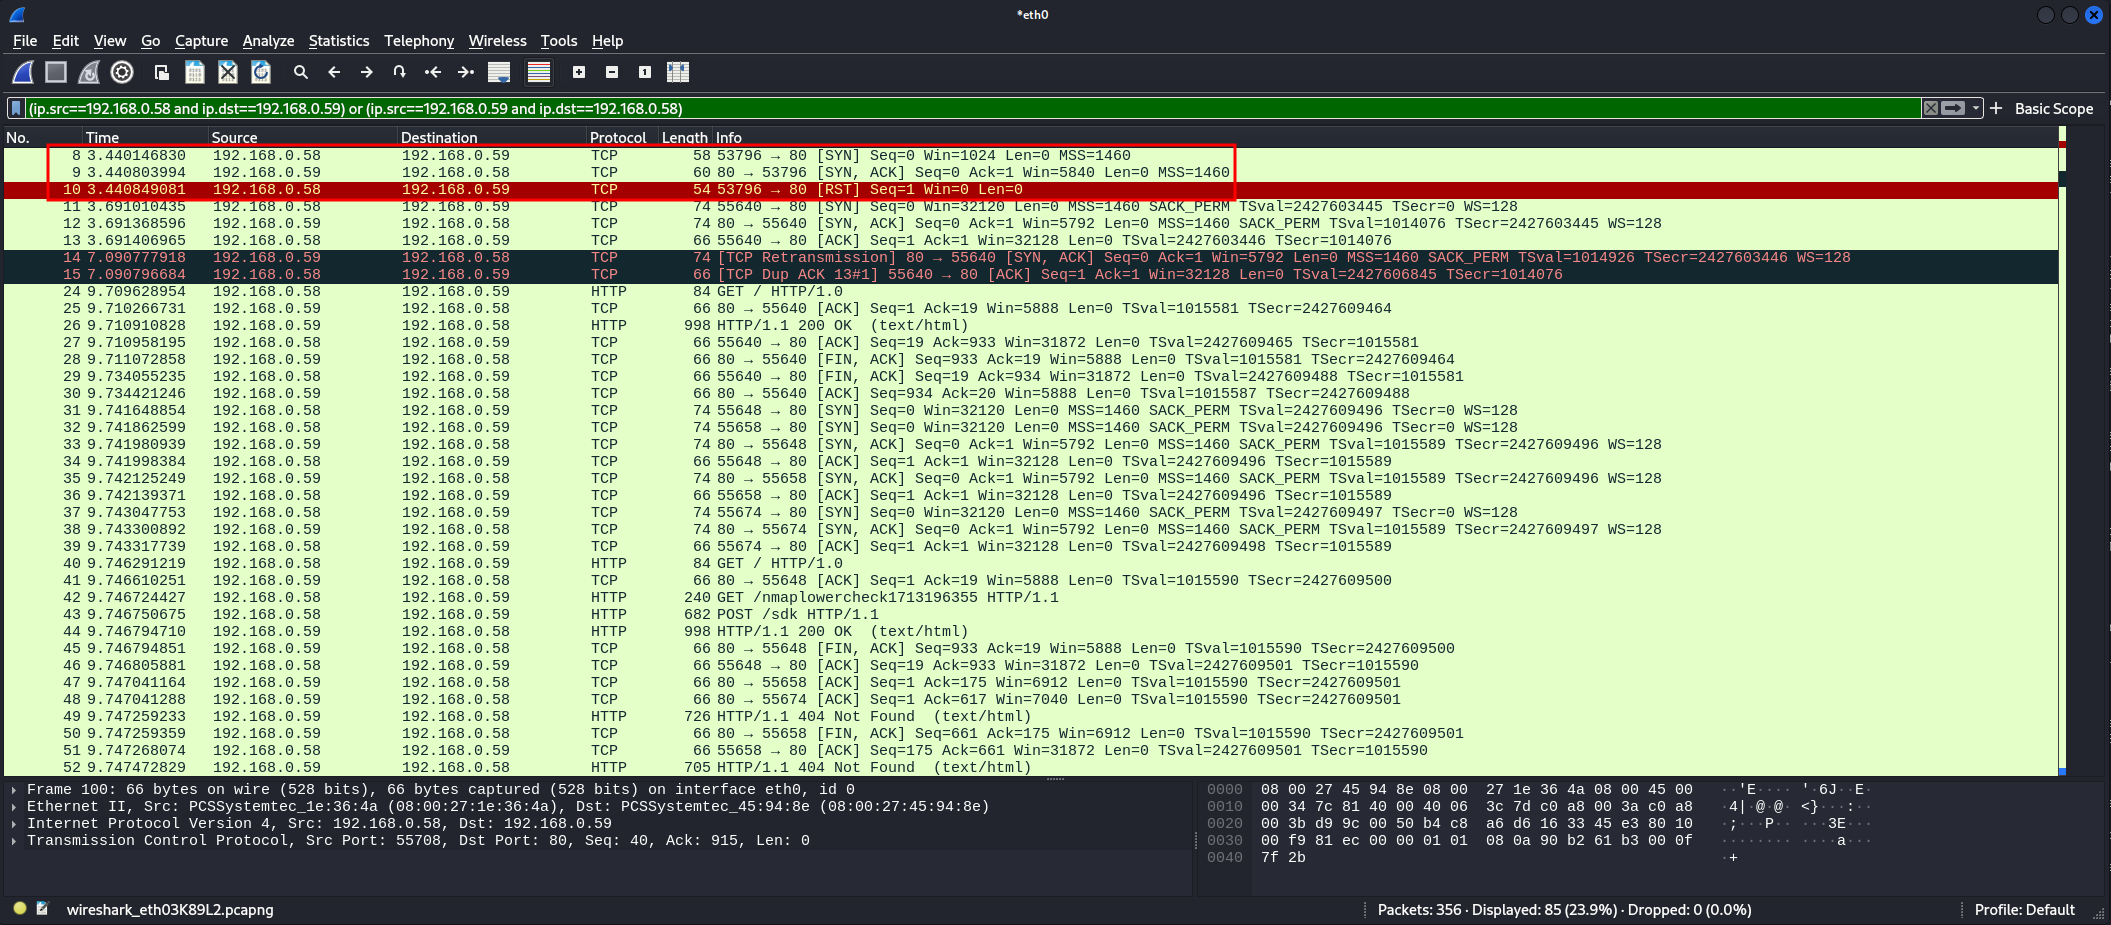
Following down the packages, we can see a lot of TCP and HTTP requests, Nmap has a multitude of procedures that it will follow to get the services information based on a service type, in your case here we have a HTTP application, so, Nmap will make sires of HTTP requests to get as much information as it can. In some of those HTTP requests, we can see de Server information in an header:
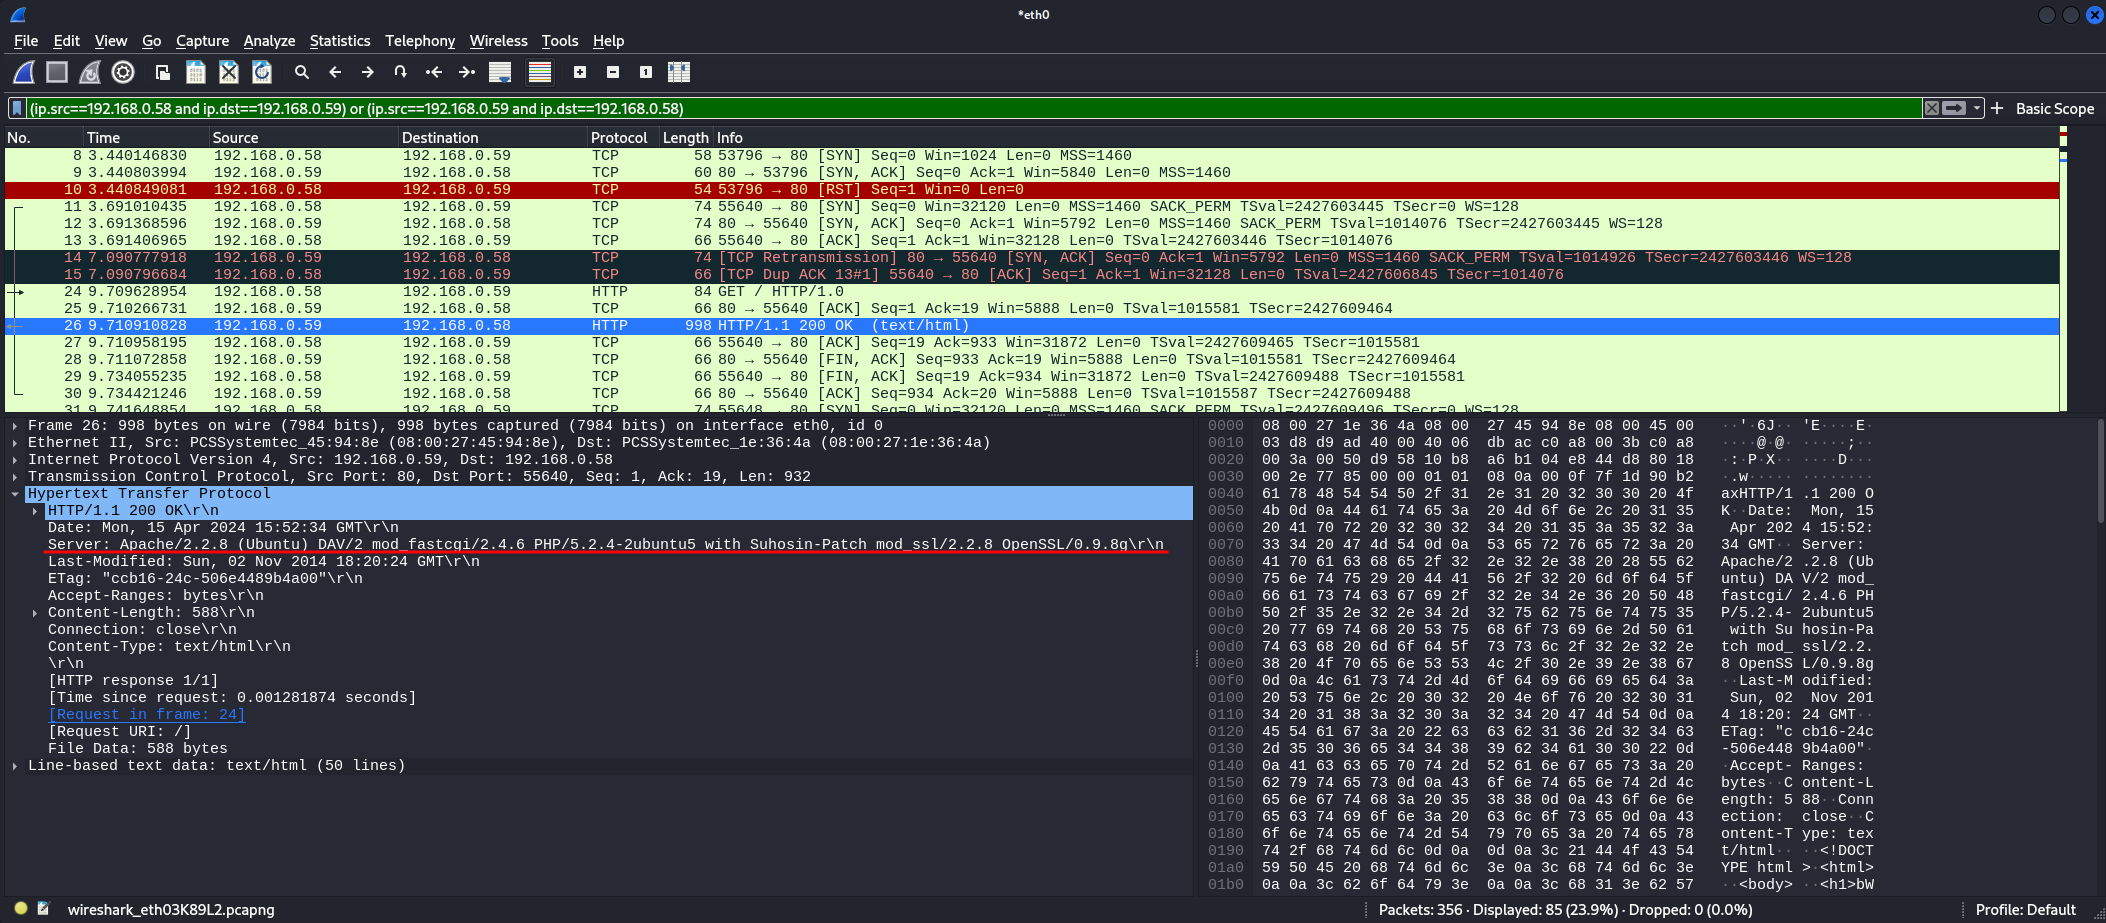
Note that the -sV argument is not a subtle scan, as we saw on the Wireshark capture. In that specific case, we can make a GET request “by hand” using netcat and get the same result, and it would be a more stealth approach:
┌──(kali㉿atropos)-[~]
└─$ nc 192.168.0.59 80
GET / HTTP/1.0\r\n

HTTP/1.1 200 OK
Date: Mon, 15 Apr 2024 16:14:24 GMT
Server: Apache/2.2.8 (Ubuntu) DAV/2 mod_fastcgi/2.4.6 PHP/5.2.4-2ubuntu5 with Suhosin-Patch mod_ssl/2.2.8 OpenSSL/0.9.8g
Last-Modified: Sun, 02 Nov 2014 18:20:24 GMT
ETag: "ccb16-24c-506e4489b4a00"
Accept-Ranges: bytes
Content-Length: 588
Connection: close
Content-Type: text/html

<Snip>
Now, since we know that the server is running an Apache httpd 2.2.8 we can search for an exploit.
OS detection
The argument -O is used to perform a OS detection on the scanned target, as we can see down below:
┌──(kali㉿atropos)-[~]
└─$ sudo nmap 192.168.0.59 -p 80-90 -O
Starting Nmap 7.94SVN ( https://nmap.org ) at 2024-04-15 12:40 EDT
Nmap scan report for 192.168.0.59
Host is up (0.00052s latency).

PORT   STATE  SERVICE
80/tcp open   http
81/tcp closed hosts2-ns
82/tcp closed xfer
83/tcp closed mit-ml-dev
84/tcp closed ctf
85/tcp closed mit-ml-dev
86/tcp closed mfcobol
87/tcp closed priv-term-l
88/tcp closed kerberos-sec
89/tcp closed su-mit-tg
90/tcp closed dnsix
MAC Address: 08:00:27:45:94:8E (Oracle VirtualBox virtual NIC)
Device type: general purpose
Running: Linux 2.6.X
OS CPE: cpe:/o:linux:linux_kernel:2.6
OS details: Linux 2.6.13 - 2.6.32
Network Distance: 1 hop

OS detection performed. Please report any incorrect results at https://nmap.org/submit/ .
Nmap done: 1 IP address (1 host up) scanned in 1.85 seconds
To make this type of scan possible Nmap performs a lot of test and compare the results to a Database of OS fingerprints, after a selection is done Nmap prints out the OS details if there is a match.
“Each fingerprint includes a free form textual description of the OS, and a classification which provides the vendor name (e.g. Sun), underlying OS (e.g. Solaris), OS generation (e.g. 10), and device type (general purpose, router, switch, game console, etc). Most fingerprints also have a Common Platform Enumeration (CPE) representation, like cpe:/o:linux:linux_kernel:2.6.“
https://linux.die.net/man/1/nmap
Note that this time we specified a scan on a range of port, from 80 to 90, that is because the OS scan can be unreliable if it couldn’t find at least 1 open and 1 closed port, in those cases, Nmap prints out a warning:
┌──(kali㉿atropos)-[~]
└─$ sudo nmap 192.168.0.59 -p 80 -O
Starting Nmap 7.94SVN ( https://nmap.org ) at 2024-04-15 12:39 EDT
Nmap scan report for 192.168.0.59
Host is up (0.00040s latency).

PORT   STATE SERVICE
80/tcp open  http
MAC Address: 08:00:27:45:94:8E (Oracle VirtualBox virtual NIC)
Warning: OSScan results may be unreliable because we could not find at least 1 open and 1 closed port
Device type: general purpose
Running: Linux 2.6.X
OS CPE: cpe:/o:linux:linux_kernel:2.6
OS details: Linux 2.6.13 - 2.6.32
Network Distance: 1 hop

OS detection performed. Please report any incorrect results at https://nmap.org/submit/ .
Nmap done: 1 IP address (1 host up) scanned in 7.26 seconds
3 responses to “Nmap – A complete and comprehensive Guide”
Dude, that is really cool, great article, keep it up!
Hi! I wanted to take a moment to thank you for this insightful blog post. Your perspectives on this matter are refreshing and well-articulated. It’s not often that I come across such well-thought-out content. Keep up the excellent work, and I’ll be eagerly awaiting your next update!
Greetings! I found this blog post to be incredibly informative and well-written. Your ability to break down complex topics into easy-to-understand language is truly a gift. Thank you for sharing your knowledge with us. I’m excited to read more of your posts in the future!